"The beauty of this world hath made me sad
This beauty that will pass:
Sometimes my heart hath shaken with great joy
To see a leaping squirrel in a tree
Or a red lady bird on a stalk ..............."
Yeah PH Pearse would have enjoyed macro.
This blog is a collection of information, thoughts, examples, ideas from various sources on macro photography with the aim to educate myself mainly and possibly others - to stimulate debate and eventually to produce worthwhile images.
Contents of this page
1. My Blogs
2. Shooting Macro
3. Macro and Focus stacking
4. Macro examples
1 My blogs Address Direct link
1. Photography johnkent1.blogspot.ie HERE
2. Exposure johnkentexposure.blogspot.ie HERE
3. Macro jkmacro.blogspot.ie HERE
4. Flash jklight.blogspot.ie Here
5. Photoshop dccphotoshop.blogspot.ie Here
6. Website johnkent15.simplesite.com HERE
7. Iceland trip iceland16.blogspot.com HERE
6. Website johnkent15.simplesite.com HERE
7. Iceland trip iceland16.blogspot.com HERE
______________________________________________________________________________
2 Shooting Macro
Very recently my first exploration into macro was marked 48 out of 50.
Followed by a 46 the following month - and a 50 in December.......
So I thought it's a pity I know so little about macro. I was always fascinated not just by other peoples work but also by the stunning usually hidden beauty of nature.
Followed by a 46 the following month - and a 50 in December.......
So I thought it's a pity I know so little about macro. I was always fascinated not just by other peoples work but also by the stunning usually hidden beauty of nature.
How could you look at the work of Magda Wasizcek or Miki Asai and not be spellbound ....
Macro photography is shooting images at a 1:1 image ratio to the subject ratio.
There are numerous ways to go about shooting macro - these include >
Compact cameras at macro setting.
Dslr at macro setting - usually a small flower symbol.
Diopter glass filter which is an enlarger that is screwed to front of lens.
Extension tubes.
Reverse the lens.
Use of bellows to take many shots and stack them.
Use of a rails to do the same.
Dedicated macro lens.
Use of a soft box to control the light.
Articles
What is the best reverse lens for macro? David Hancock
28mm 2.8 Manual exposure and focus Cable release and mirror lock up LED lights
Reverse ring are inexpensive Eur 12 58mm fits the Nikon 50mm 1.8
Sample of Macro lenses:
Nikon 105mm f/2.8 Micro
Canon 100mm Macro
Nikon 60mm f/2.8D AF Micro-Nikkor Lens
Canon 60mm Macro
Modern thinking > If you want to get closer, don't even bother with 50mm or 105mm macro lenses; skip all the way to the Canon 180mm Macro or the Nikon 200mm Macro lenses.
Ken Rockwell 2013.
Why? If you get the camera too close, you:
1.) Get in the way of your own lighting.
2.) Annoy live subjects like bugs.
3) Show the subject in an unnatural perspective.
I have a 105 D 2.8 which I am happy with at the moment.
I am using off camera flash - using the built in camera flash to trigger it.
I need to be able to control the power of the of both flashes. And since my exploration into speedlights I can manage that now.
jklight.blogspot.ie (which is No. 4 above)
jklight.blogspot.ie (which is No. 4 above)
I am not responsible for all these opinions!
I put them out there to be contradicted or otherwise.
I put them out there to be contradicted or otherwise.
Lens Sharpness - No matter how sharp your lens, it won't matter because very little will be in perfect focus to notice. Since you'll be shooting at around f/32 to try to get at least one tiny swath in focus, diffraction is the limiting factor regardless of lens.
180 and 200mm lens - give you a good working distance - that is the distance between the front of the lens and the subject. This is important for lighting your subject and the perspective will be natural. But as you correctly point out - sometimes perspective is totally unimportant in our shot.
Nikon 200mm f/4 .... "The 200mm Micro is Nikon's sharpest 200mm lens for use as a general purpose telephoto, as well as the dream lens of bug photographers". Ken Rockwell
Nikon 200mm f/4 .... "The 200mm Micro is Nikon's sharpest 200mm lens for use as a general purpose telephoto, as well as the dream lens of bug photographers". Ken Rockwell
Serious macro is shot in Manual mode because it is faster and easier.
So a good old Manual focus lens could be the job!
Many people focus the lens and then move /rock gently forward and back until they see the desired focus.
There is no DOF at macro distances so shoot everything at f/32 - not sure I agree with that.
You will need flash to shoot at f/32
Try to orient your subjects so they lie in the plane of focus if you are trying to have everything sharp.
You don't need VR or IS lens.
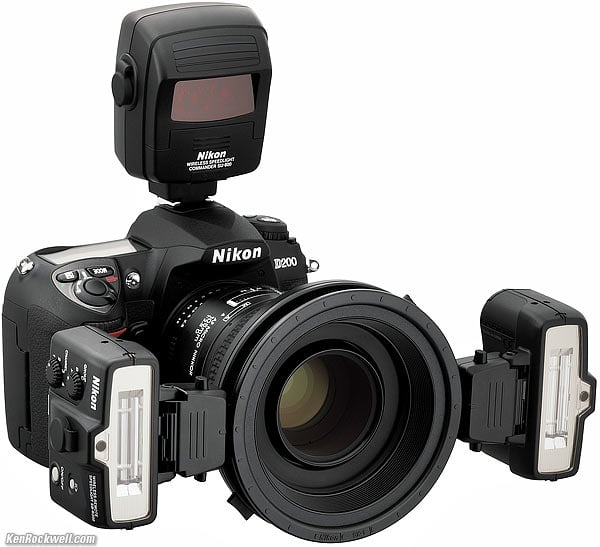
The R1C1 system above - excellent if expensive. $719 / £574 Amazon.uk
Ring lights have too much power - too harsh.
Lighting is so important - with flash, colours are better and we get a faster shutter.
A flash mounted to top of camera gives a harsh light and unwanted shadows.
Soften the light with a diffuser e.g. Omni Bounce diffuser.....
see Thomas Shahan's set up below.
see Thomas Shahan's set up below.
You need to be able to set and control the flash power
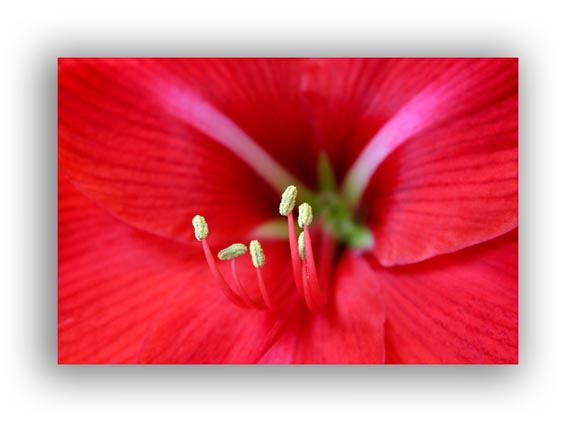
Below the light striking the anthers was just right to visually separate them from the brilliant red petals behind. It's also a good example of how a slightly out of focus background works well in a photo.
A mini Maglite torch is very useful for macro.
Continuous light or flash light option.
When it comes to macro photography, its success is often dependent upon the photographer's understanding of light. The biggest issue is vibration.
Any movement, however slight, of the camera or the subject causes a blur. The closer you are to a subject, the more the photograph is going to capture any vibration or movement. Even a tripod-mounted camera can cause a vibration when the shutter is pressed. If the subject is far away you most likely won't notice this vibration, but when the subject is very close, this vibration is much less forgiving.
One solution is using light.
The more light the faster the shutter.
Reflectors / diffusers e.g neutral coloured semitransparent material.
************************************************************************************************************
3 Macro and Focus stacking
Because the DOF is so shallow with macro photography, 'they' have come up with some software that will allow you to combine multiple images taken at different focus distances and combine them, similar to HDR images, in order to get an image with a greater depth of field than otherwise possible.
Firstly Get the shots.
I use a TRIPOD -
REMOTE release
a stand for the SPEEDLIGHT - possibly a shoot through umbrella
A TABLE LIGHT for continuous light on the subject - a big help for focusing.
WHITE BACKGROUND - eliminate background distractions
Probably an EXTENSION TUBE or two on a 105mm 2.8 lens
You can use a *focus rail
Or manually roll the barrel of the lens to focus each shot.
*Focusing Rails
You can use a *focus rail
Or manually roll the barrel of the lens to focus each shot.
*Focusing Rails
The ability to be very precise in focusing is vital to capturing “tack sharp” macro images. Focusing rails allow you to mount your camera on a tripod and then move the camera along the rails with very precise control, which makes it much easier to obtain a good sharp focus.
1. Setup: Setting up is a bit of a pain - but if done carefully will save you frustration.
Give yourself plenty of space
Place the 2 stands, and subject so that you are happy with the setup and background.
Have a few subjects - you may find the first choice is just not working.
Decide whether you are going to shoot portrait format or landscape / in other words plan the composition.
2. Start by focusing on either the nearest point (A) or furthermost point(B) of the flower that you want to be in focus in the final image. At this stage you should have a good idea of the final composition you are after.
Do a trial with the lens rolling it in Manual focus with either the rail or by hand and watch the various points of the flower coming into focus. This is where the continuous light is a great help.
You need to be getting about 12 shots.
if you are getting only 6 between A and B you are going too fast.
Barely move the lens - you should hardly notice the movement.
When you are finished put your hand over the lens and shoot another shot!
This black shot separates trial 1 from the next shoot.
Now do it all over again>
After 3 takes you should be ready to process.
Separate each 12 with a black shot.
If you have Live view - it is the way to go.
Have a look at this YOUTube video > HERE
That video is getting only one point in focus - you would have to repeat for each focus point.
"I have Live View on my Canon 5D Mark II and I love that when I am shooting macros I can put it in Live View, then magnify the image on the LCD viewer, manually focus until I get it exact and then take the shot with a remote shutter release. Touching the camera after acquiring focus may move the camera slightly, but if you have the camera securely tightened to a solid tripod, and you are very careful when you hit the Live View release button, the camera shouldn't move out of focus. You can then take the shot using a remote shutter release". Brad Sharp.
 This is Mark's shot.
1/60 sec. @ f/22 ISO 100 Lens: EF 24-70mm f/2.8L USM + tube - tripod
He says:
For this image I wanted the largest depth of field possible so I used f/22 (f/32 was the max). Since there were so many points that the autofocus could focus on I use manual focus, combined with Live View - magnified so that I could fine-tune the focus.
ISO 100
Give yourself plenty of space
Place the 2 stands, and subject so that you are happy with the setup and background.
Have a few subjects - you may find the first choice is just not working.
Decide whether you are going to shoot portrait format or landscape / in other words plan the composition.
2. Start by focusing on either the nearest point (A) or furthermost point(B) of the flower that you want to be in focus in the final image. At this stage you should have a good idea of the final composition you are after.
Do a trial with the lens rolling it in Manual focus with either the rail or by hand and watch the various points of the flower coming into focus. This is where the continuous light is a great help.
You need to be getting about 12 shots.
if you are getting only 6 between A and B you are going too fast.
Barely move the lens - you should hardly notice the movement.
When you are finished put your hand over the lens and shoot another shot!
This black shot separates trial 1 from the next shoot.
Now do it all over again>
After 3 takes you should be ready to process.
Separate each 12 with a black shot.
If you have Live view - it is the way to go.
Have a look at this YOUTube video > HERE
That video is getting only one point in focus - you would have to repeat for each focus point.
"I have Live View on my Canon 5D Mark II and I love that when I am shooting macros I can put it in Live View, then magnify the image on the LCD viewer, manually focus until I get it exact and then take the shot with a remote shutter release. Touching the camera after acquiring focus may move the camera slightly, but if you have the camera securely tightened to a solid tripod, and you are very careful when you hit the Live View release button, the camera shouldn't move out of focus. You can then take the shot using a remote shutter release". Brad Sharp.
1/60 sec. @ f/22 ISO 100 Lens: EF 24-70mm f/2.8L USM + tube - tripod
He says:
For this image I wanted the largest depth of field possible so I used f/22 (f/32 was the max). Since there were so many points that the autofocus could focus on I use manual focus, combined with Live View - magnified so that I could fine-tune the focus.
ISO 100
But to improve visibility in Live View (LV) while focusing - Move up the ISO to 4000
Reduce ISO before shooting. Or use a lamp.
(Optional) Tethered shoot to laptop > Lightroom or Canon EOS Utility /Lights in place /
Leave room for cropping as you shoot
ISO 100 1/125s f/9
12 shots are ready - what then?
12 shots are ready - what then?
Open all images in Bridge - How?
I download them to Picasa first from the camera and Select all and drag hem to Bridge which I have opened in Photoshop.
How do you open Bridge?
In PS go to File / Browse in Bridge
Next in Bridge Select all the 12 shots and
The go to >> Tools/Photoshop/Load files in Photoshop layers
Now you are back in Photoshop
The Layers palette is open and all the 12 shots are visible there
Select them all again
Then - Edit/Auto align layers
Run in Auto when you open Auto align layers - both boxes unchecked OK
All layers selected - Edit/ Auto blend layers/ Stack Images (not pano)
Crop as needed.
***********************************************************************************************************
4 Macro examples
Thomas Shahan: -


********************************************************************************************************
Interview with Magda Wasiczek Click to open.
 Equipment she uses> Nikon D300 0or 700
Tamrom 90 Macro rings
Reflector
No tripod
Some of her shots
.jpg)
.jpg)
____________________________________________________________________________
Thomas Shahan: -
********************************************************************************************************
Interview with Magda Wasiczek Click to open.
Tamrom 90 Macro rings
Reflector
No tripod
Some of her shots
____________________________________________________________________________
Equipment used by Thomas Shahan>>
"Equipment is secondary - you can do a lot with a little".
"Equipment is secondary - you can do a lot with a little".
Get to know your subject especially working with insects - behaviour - BugGuide (identification).
Pictures showing camera with reversed lens and extension tube
Home made diffuser on flash - mounted on a bracket
Possibly the Novoflex flash bracket - can take 2 external flash guns.
You need to be able to control the power of the light!!!!
Remote
.jpg)
Pictures showing camera with reversed lens and extension tube
Home made diffuser on flash - mounted on a bracket
Possibly the Novoflex flash bracket - can take 2 external flash guns.
You need to be able to control the power of the light!!!!
Remote
.jpg)
******************************************************************************************************
"Painted by Light" blog by Andrea Gulickx
Blog site > http://paintedbylight.blogspot.com/
Web site > http://www.andreagulickx-photography.com/
Alberto Ghizzi Panizzi. Link HERE
Channel Four >>> Ants Fascinating scientific research on leaf cutter ants.
Blog site > http://paintedbylight.blogspot.com/
Web site > http://www.andreagulickx-photography.com/
Alberto Ghizzi Panizzi. Link HERE
Channel Four >>> Ants Fascinating scientific research on leaf cutter ants.
I am searching for a great macro web site on ants .. can't find the one I want - there are lots. This was a female photographer…..as you can see I just found her!
Japanese Photographer Miki Asai
www.demilked.com/macro-nature-photography-miki-asai
What she uses:
Canon EOS Kiss x5 (= Rebel T3i) Canon EF-S60mm f/2.8 macro USM
Velbon GEO E535M
Lightroom 5 and color Efex Pro 3.0
Settings : 1/250 f/6.3 ISO 800 Exposure compensation -0.3EV
In this shot post production she used Color Efex pro Pastel to achieve a particular colour.
In LR 5 she adjusted colour temperature, Hue/Saturation, sharpness and WB.
Read more here: Tips from Miki.
.jpg)
.jpg)
Her advice >"Patience is the only way".
**********************************************************************************************************
Make your own soft box (Light tent) by Strobist

This is a much better example - you can change the backdrop colour easily.
Windows on each side - diffused controllable light.
**********************************************************************************************************
Make your own soft box (Light tent) by Strobist
Windows on each side - diffused controllable light.
_________________________________________________________________________


.jpg)
.jpg)
.jpg)
Buy some exotic flowers for your partner - then get out the gear and go to work!
I was trying combinations of extension tubes and different lens at home on Sat.
Many lens are totally unsuitable for this method because it is not possible to focus -because you are inside the minimum focusing distance for that lens.
Every lens has a minimum focusing distance.
What I am learning is that just because you can get very close and you have a promising subject - does not guarantee you a good image. At very close range background does not matter because the whole image is occupied with the flower.
Choice of BACKGROUND matters very much - when there is a background.
COMPOSITION imo is the most important element.
Ideally you see the composition before/as you shoot - that takes practice when you are very close. Of course you may rely on cropping to find a good composition within the image.
LIGHTING - for sharp results you need lots of light.
There are volumes of stuff that I know nothing about when it comes to lighting with flash.
Rather than bore you with flash talk I have opened a new blog at
jklights.blogspot.com


The third one is interesting especially where there is a swirl from top Left to to top right - not that noticeable here. Keep thinking - how far can I take this so that I could present it in competition.
Ger Donnelly's Rhino horned beetle - native of China!

************************************************************************
*****************************************************************************
PAY ATTENTION TO YOUR BACKGROUND
.jpg)
.jpg)
DOF
.jpg)

.jpg)
.jpg)
50mm lens 200mm lens
.jpg)
.jpg)
A bigger light source is softer ............Umbrella between the flower and the Sun.

.jpg)
.jpg)
Some of my own work
**********************************************************
We had Niamh Whitty in the club recently WOW .....
***********************************************************************************
BOKEH
Here begins my investigation into the bokeh effects achieved by Magda.
Here is a link to creating designer bokeh as in Hearts with the camera > BOKEH
We made reference to it at the meeting.


Here's a hot tipBOKEH
Here begins my investigation into the bokeh effects achieved by Magda.
Here is a link to creating designer bokeh as in Hearts with the camera > BOKEH
We made reference to it at the meeting.
But keep in mind that Bokeh only means "blur" so you may not get those circular shapes that Magda and Asai get! - just a blurred background which we already knew how to achieve.
1, How to create bokeh in Photoshop: Here is the link > Photoshop Bokeh
Very specific, easy to follow and good fun to see the results.
This is the result >
I know you wouldn't ever dream of doing it .... ever ....
But I know somebody who might ...
Here is another version of it - not that easy to follow in PS
Colours, level of Blur, Opacity , Size, frequency can all be easily controlled in PS.
Colours, level of Blur, Opacity , Size, frequency can all be easily controlled in PS.
Link > Bokeh 2
2. Those of you who learned your Photoshop from the CD that still comes with "Digital Photo" magazine will be familiar with Gavin Hoey. Now Gavin is a clever bloke - and points out that the source for the little circles of bokeh needs to be small bright spots of light.
Manual focus + f/4 (or lower) + Zoom in (100mm lens)
Here is the link > Gavin Hoey
So basically your subject is in focus and the background light spots are out of focus - and that's where the bokeh is created.
So are the background lights spots in some macro shots dew drops lit by the sun?
On a recorded programme on TV last night I noticed this >
1. The tiny light in the background are in focus and the singer is not.


Of course we don't need bokeh all the time in our shots. But I do like it.
I am still curious as to how it is achieved in the field.
So are the background lights spots in some macro shots dew drops lit by the sun?
On a recorded programme on TV last night I noticed this >
1. The tiny light in the background are in focus and the singer is not.
2. Then the camera focused on the singer - putting the lights which were a good distance back out-of-focus and there it was ... buckets of Bokeh!
I am still curious as to how it is achieved in the field.
To be continued ............
+++++++++++++++++++++++++++++++++++++++++++++++++
Buy some exotic flowers for your partner - then get out the gear and go to work!
I was trying combinations of extension tubes and different lens at home on Sat.
Many lens are totally unsuitable for this method because it is not possible to focus -because you are inside the minimum focusing distance for that lens.
Every lens has a minimum focusing distance.
Elements to consider
Composition
Background
Lighting within the subject
Backlighting
Post processing
What I am learning is that just because you can get very close and you have a promising subject - does not guarantee you a good image. At very close range background does not matter because the whole image is occupied with the flower.
Choice of BACKGROUND matters very much - when there is a background.
COMPOSITION imo is the most important element.
Ideally you see the composition before/as you shoot - that takes practice when you are very close. Of course you may rely on cropping to find a good composition within the image.
LIGHTING - for sharp results you need lots of light.
There are volumes of stuff that I know nothing about when it comes to lighting with flash.
Rather than bore you with flash talk I have opened a new blog at
jklights.blogspot.com
***********************************************
Drops by Caitriona Whyte
Drops by Caitriona Whyte
The third one is interesting especially where there is a swirl from top Left to to top right - not that noticeable here. Keep thinking - how far can I take this so that I could present it in competition.
Ger Donnelly's Rhino horned beetle - native of China!
************************************************************************
*****************************************************************************
PAY ATTENTION TO YOUR BACKGROUND
DOF
50mm lens 200mm lens
Aperture + parallel to the subject to increase the DOF.
The butterfly would have been sharp if the camera was parallel to it.
Note how the stem disappears with f/2.8
A bigger light source is softer ............Umbrella between the flower and the Sun.
Small reflector very useful also.
Softer light with diffuser.
.jpg)
HEREHERE